Everything you have done so far in this book has been indoors or in your personal space. You have held the disc, spun it on your fingers, thrown it to the ceiling from your back, and tossed it a foot above your head while standing. Your hands are trained. Your fingers are strong. Your wrist is fast.
Now you go outside. And everything changes.
The big difference when you take your drills outdoors is distance. Indoors, you throw the disc a few feet. Outdoors, you can throw it 50 yards. That distance introduces three things that indoor training cannot replicate: wind, reading the disc in flight over a long path, and jumping to catch it at the peak of your leap.
When you were inside, you never had to jump. The disc was always right there, a foot or two above you. Outside, the disc is sailing, floating, curving, and dropping from 30 feet in the air. You have to track it, sprint to it, time your jump, and catch it at the apex of your jump, either one handed or two handed. And then rotate and land. That is a completely different skill than anything you have done indoors.
This is also where Eric Knudsen's wisdom applies. It is all about spin. Indoors, you were limited in how much spin and power you could put on the disc. Outdoors, there are no limits. You can try maximum force, maximum spin, and see what happens. The disc will go crazy directions. It will curve, dive, stall, and do things you did not expect. And that is exactly what you want. The more you push your limits outside, the stronger you grow. The muscle memory and flow you built indoors now gets tested against nature. And nature does not go easy on you.
Drill 1: Throw Up and Catch in the Wind
This is the foundation outdoor drill. It is simple and it is powerful.
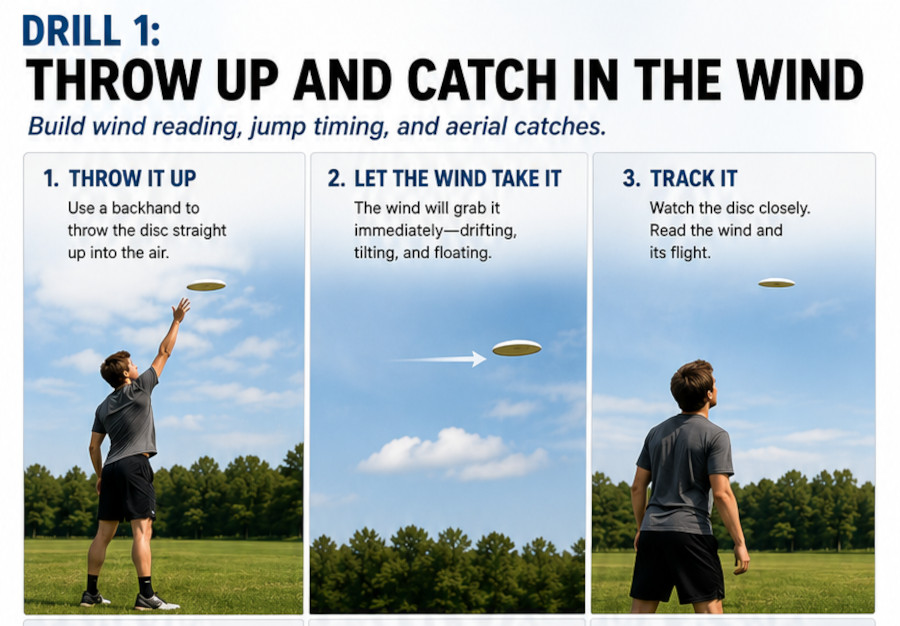
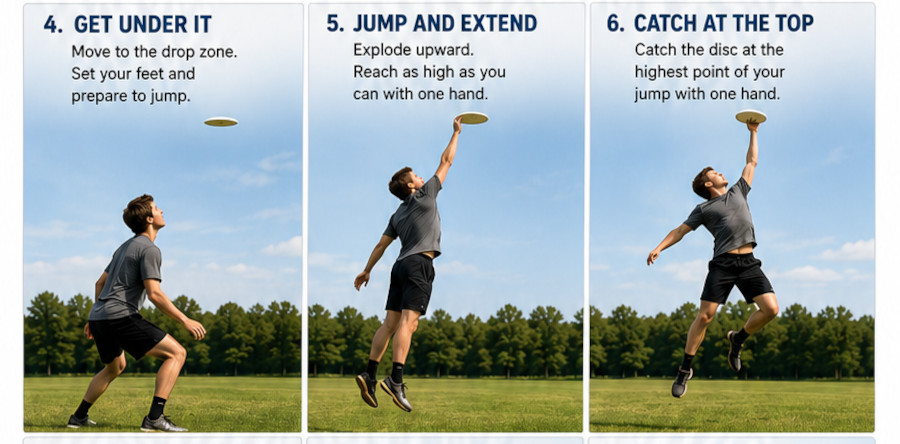
Go outside on a windy day. Throw the disc straight up into the air with a backhand. Let it go high. The wind will grab it immediately. It will drift, tilt, float, and come down in a different spot than where you threw it. Track it. Get under it. Time your jump. And catch it at the top of your leap.
That is wind practice. That is catching practice. That is jumping practice. All in one drill.
A backhand thrown straight up is the easiest starting point. A push pass works well too because it floats gently and gives you more time to read it. You can try a flick going straight up but it is much more difficult and the disc tends to curve hard in the wind.
The wind is doing several things for you at once. It is teaching you how the disc reacts to air currents. You start to see how an inside out release drifts one way and an outside in release drifts the other. You feel how a headwind holds the disc up and a crosswind pushes it sideways. You learn to read the wind before you throw by watching the grass, feeling it on your face, looking at flags or tree branches.
Windy days are not excuses to stay home. They are the best solo training days you can get. When everyone else is inside, you are outside building instincts that they will never develop.

The jumping emphasis: Every catch in this drill should involve a jump once you are comfortable. Do not just stand there and wait for the disc to come to you. Attack it. Sprint to where it is going, plant your feet, explode upward, and catch it at the highest point you can reach. One handed is better than two handed for training purposes because it forces you to fully extend.
Time the top of your apex to the moment you catch the disc. That timing is one of the hardest skills in Ultimate and you can only develop it by doing it over and over. Every rep of this drill is a rep of jump timing.
Rotate after you catch. Once you catch the disc at the top of your jump, practice rotating your body while you come down. In a game, you catch the disc in the air and immediately need to see where your teammates are and where you can throw next. Building that rotation into your catch now means it becomes automatic in a game.
Drill 2: Wall Throws
Find a tall concrete or brick wall. A school building, a parking garage, a retaining wall. This is your best solo throwing partner because it never gets tired, never drops the disc, and always throws back at weird angles that force you to react.
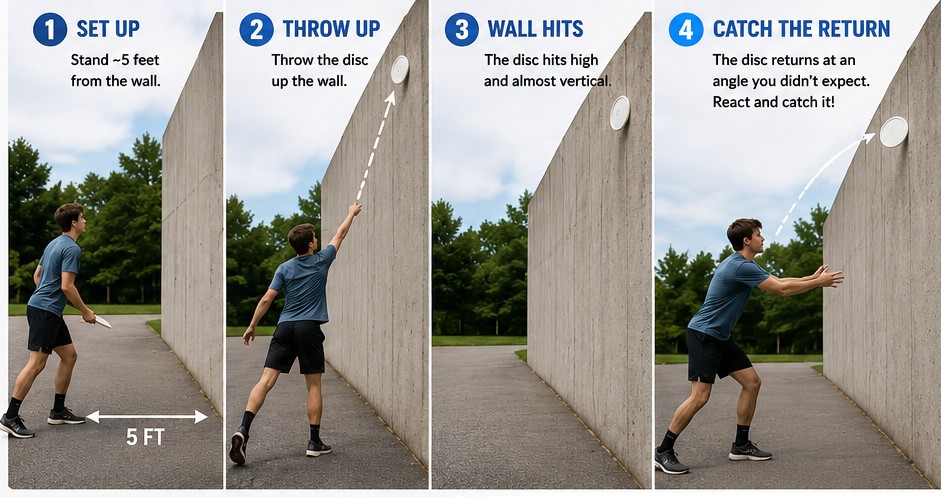
The basic drill: Stand five feet from the wall. Throw the disc at the wall. Catch the return. That is it. But the return will come back at an angle you did not expect. It will bounce off the wall spinning in a different direction than you threw it. Your hands have to react instantly.
Practice every throw type against the wall. Backhands, flicks, push passes, hammers. Each one bounces back differently. Each one gives you a different catching challenge.
Progression: Start close at five feet. Move to 10 feet. Then 15. Then 20. The further back you are, the harder you throw, and the faster the return comes at you.
The jumping and one handed catch: As you get comfortable, start catching the returns with one hand. Then start jumping to catch the returns. The wall will occasionally bounce the disc high, and those are your opportunities to practice jump timing and one handed catches in a reactive situation where you do not know exactly where the disc is going.
Practice spinning around after the catch. Throw, wall returns it, you jump, catch it one handed at the top of your leap, rotate, and land facing a new direction. That sequence is exactly what happens in a game when you catch a disc in traffic.
Indoor option: You can do wall throws indoors in a big basketball gym where there is no wind. This is great for pure throwing and catching reps without the wind variable. You can focus entirely on your release angle, spin, and reaction catches. Just be mindful of how close you are to the wall so you do not run into it on a jump catch.
Drill 3: Target Practice
Pick a target. Try to hit it. That is disc golf thinking applied to Ultimate training.
The targets can be anything. Trash cans. Laundry baskets. Soccer nets. Trees. Fences. Specific spots on a wall. Anything you can see and aim at. The USA Ultimate Skills Challenge has two target drills that give you structure:
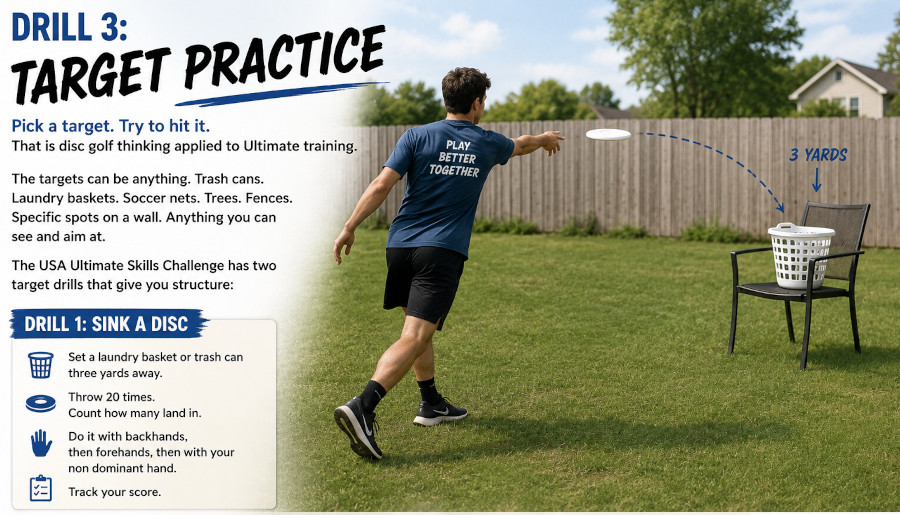
Sink a Disc: Set a laundry basket or trash can three yards away. Throw 20 times. Count how many land in. Do it with backhands, then forehands, then with your non dominant hand. Track your score.

Accuracy Ladder: Start three yards from a trash can. You get three attempts to hit it. If you hit it, move back three yards. Miss all three? Game over. See how far back you can get before your three attempts run out. This is a self escalating difficulty drill that pushes you right to the edge of your accuracy.
But you do not need official drills to do target practice. When I go hiking, I usually bring a disc. I throw it and try to hit certain trees. I throw at fences. I throw into soccer nets. Sometimes I just let it rip to see and feel what that maximum power movement looks like and how the disc reacts. It is this idea that anywhere you go, if you have a disc and you can see something to aim at, you have a training opportunity.
Like disc golf. You pick a target and you try to hit it. That simple.
→ Action Step: Set up a laundry basket in your yard. 20 flicks, then 20 backhands. Track your score weekly. Watch it climb.
Drill 4: Skip Throws on Pavement
This is one of the most fun drills you can do outdoors, and it requires soft discs.
Find a smooth paved surface. A driveway, a parking lot, a basketball court. Throw a flick or backhand with power, releasing the disc at a low angle so it hits the pavement and skips up into the air. The disc bounces off the ground and rockets upward with spin.

Experiment with your release angle. A flatter angle produces a lower, faster skip. A steeper angle produces a higher pop. Adjust your spin to control the direction the disc goes after the skip. This teaches you how the disc interacts with surfaces in a way that nothing else can.
This is especially valuable for learning your flick release angle. You can see exactly what angle the disc hits the ground at, and that visual feedback tells you whether your throw would have been flat, inside out, or outside in if you had thrown it to a teammate.
The Stomp Game: Here is a fun game I play with kids that teaches disc tracking and reaction speed. You throw the disc hovering right above the pavement, as low as possible, going super fast toward the other person's feet. They have to stomp on the disc before it rockets past them or slides underneath their feet. Sometimes you pick up your foot and the disc has already gone underneath. It is hilarious and competitive and it teaches you to throw with precision at ground level while the other person develops crazy fast reaction time with their feet.
You can practice the throwing part solo. Just throw it low and fast across a smooth surface and watch how the disc behaves at different speeds and angles. The more you understand ground level disc behavior, the better your low release throws become in a game.
Drill 5: Pull Practice
The pull is the one throw in Ultimate that is always a solo moment. You are standing on the line, nobody is marking you, and you have unlimited time. Every other throw in the game has a defender in your face and a stall count ticking. The pull is just you and the field.
A great pull gives your team a massive advantage. It pins the offense deep in their own territory and forces them to work the entire length of the field to score. A bad pull gives the offense a head start. This is one of the most important throws in the game and it is 100% a solo skill.
The setup: Bring at least six discs to an open field. Nine is better. Line them up. Throw them one after another, as hard and far as you can. Then walk down and collect them all. Walk back. Do it again.
What to focus on: Experiment with different angles. Try a flat release. Try an inside out release that curves. Try an outside in release. Experiment with your run up. Take a few big steps before you release, twisting your torso and using your whole kinetic chain. Hips, core, shoulder, arm, wrist, fingers, all firing in sequence.
The first couple of pulls will feel stiff. By the third or fourth one, your body loosens up and you start to find the rhythm. By the sixth throw, you are sailing it. This is normal. Your body needs a few reps to calibrate.
Once you do this consistently and learn how to really drive your footwork to start the kinetic chain strongly, you will become a powerful thrower. And here is the beautiful transfer: when you go to throw a normal backhand to somebody 20 yards in front of you, it becomes so much easier. You just dial back the power. The movement is already there. The muscle memory is already built. You are simply choosing to use less of it.
We go much deeper into pull technique later in this book, including the full Tornado Pull technique. For now, the important thing is to start getting reps. Go to a field. Throw as hard as you can. See what happens. Learn from every throw.
Why Practicing the Pull is Critical by Ultimate Rob
The Outdoor Advantage: Pushing Your Limits
The biggest difference between indoor and outdoor practice is not the wind or the distance. It is permission.
Indoors, you hold back. You throw gently. You control everything. You have to, because the ceiling is eight feet away and the walls are close.
Outdoors, there are no limits. You can throw with maximum force, maximum spin, maximum power, and see what happens. And when you push those limits, something important happens. The disc goes in crazy directions. It does things you did not plan. It curves when you wanted it to go straight. It dives when you wanted it to float.
And that is how you learn. Every wild throw teaches you something about release angle, spin rate, wind interaction, and power control. You cannot learn these lessons indoors. You have to go outside, let it rip, and see what the disc does when you push it to the edge.
Hopefully the muscle memory and flow you built in the indoor chapters gives you a solid foundation. Now it is time to test that foundation against nature. The more you push your limits outdoors, the stronger and more confident you become.
Wrap Up
◆ The big difference outdoors is distance, wind, and jumping. Indoor drills build the mechanics. Outdoor drills build the application.
◆ Throw the disc up into the wind, track it, sprint to it, and jump to catch it at the apex of your leap. This is the foundation outdoor drill.
◆ Wall throws give you unlimited throwing and reactive catching reps. The wall never drops it and always throws back at weird angles.
◆ Target practice is disc golf thinking applied to Ultimate. Pick a target, any target, and try to hit it. Trees, trash cans, fences, soccer nets.
◆ Skip throws on pavement teach you release angles through instant visual feedback. The Stomp Game adds fun and competition.
◆ Pull practice is the one throw that is always solo. Bring six to nine discs to a field and throw them as hard as you can. The power you build transfers to every other throw.
◆ Outdoors is where you push your limits. Maximum force, maximum spin, maximum experimentation. That is where the biggest growth happens.
Action Steps
→ Next windy day, go outside with two discs. Throw backhands straight up and practice catching them in the wind with a jump. 20 reps each hand.
→ Scout a wall near your home. Go throw 50 wall throws mixing backhands and flicks. Practice one handed reaction catches.
→ Set up a trash can or laundry basket and do the Accuracy Ladder. See how far back you can get. Both hands.
→ Find a smooth pavement surface and try five skip throws with a soft disc. Experiment with the angle. Try the Stomp Game with a friend or a kid.
→ Bring six discs to an open field this week. Throw six max power pulls. Collect. Repeat three times. Notice how the third round feels different from the first.
Mentor's Closing
You have spent the last three chapters building something that most players never build: a relationship with the disc that goes beyond casual familiarity. Your fingers know the rim. Your wrist knows the snap. Your hands know how to catch in any orientation.
Now you are outside with all of that training inside you, and the field is wide open. The wind is blowing. There is a wall waiting. There is a target to hit and a pull to launch.
This is where it starts to feel like the sport you fell in love with. Not a drill. Not an exercise. Just you, a disc, and an open sky.
Go throw it as far as you can. Then go get it. And throw it again. :)