
Whenever I meet kids who know how to throw, or new people at pickup, one of my favorite things to do is test their arsenal. I will say, "Can you do this?" and throw a hammer. Usually they can. Then I throw a scoober. Maybe 80% know what that is. Then I throw a thumber. Most people have not seen it or tried using it. Then I take that same grip and throw a chicken wing, over the shoulder with my thumb underneath. People then know I am testing their throw inventory and they usually throw something exotic back at me.
Sometimes those people show ME throws I have never seen. That is the magic of Ultimate. We are always learning from each other. The vocabulary of throws is always expanding. And the more words you know, the more you can say on the field.
Think of it like chess. Your backhand and your flick are your rooks. They move in straight lines, powerful and direct. They cover a lot of ground and they are the workhorses of your game. But the specialty throws, the hammer, the scoober, the thumber family, they are your bishops. They travel in arcs. They curve over the defense and drop in from angles that nobody expects. A player with only rooks is strong. A player with rooks AND bishops controls the whole board.
Learning these specialty throws will actually make your backhand and flick better, too. You will develop a deeper understanding of how the disc flies from your fingers. You will have more confidence on the field. You will have more fun. And in those rare moments when you need something other than your primary throws, you will be ready to get the disc to your receiver any way necessary.
But First, A Warning
Read that opening quote from Khalif one more time. "I only throw throws with a large margin of error. The more difficult the throw, the easier it is to turn over."
Khalif El-Salaam is a six time World Champion. He is one of the most decorated players alive. And his throwing arsenal in games? Forehand, backhand, lefty backhand. That is it. He avoids the thumber, the scoober, and the hammer break in competitive situations. Not because he cannot throw them. Because the risk reward math does not work in his favor at the highest level of competition.
Seth Martin, who coaches at Jackson Reed High School, a program that regularly produces DC Breeze professional players, takes it even further. At Jackson Reed, only two players per team are "cleared" to throw hammers in games. Everyone else? Forbidden. Until they earn it.
How do you earn it? You demonstrate accuracy in practice, over and over. You prove that you have a reliable flick first. You show that you know your limits and understand when NOT to throw the specialty throw. You choose the right timing and spacing during scrimmages.
The lesson is important and I want you to hear it clearly: master your backhand and flick FIRST. The specialty throws are privileges earned through proven fundamentals. They are not shortcuts. They are not replacements. They are additions to a foundation that must already be solid.
That said, David Raflo, USA Ultimate's Events Manager, offers the counterpoint: "Why wait? If it's there, take it."
And he is right. Once you have earned these throws, once you have put in the practice and built the accuracy, do not hesitate. When the window opens, throw it. Confidence is earned through preparation, and preparation is what this chapter is about.
Understanding Upside Down Physics
Before we get into specific throws, you need to understand something fundamental: the hammer, the scoober, and some thumber variations fly upside down. And an upside down disc behaves completely differently than a right side up one.
Think about why a normal disc flies. The curved top creates lift, like an airplane wing. Air moves faster over the top than under the bottom, and that pressure difference holds the disc up. The rim underneath acts like a channel, keeping the airflow organized and stable.
Now flip the disc over. The curved surface is on the bottom. The rim is on top, pointing at the sky. The aerodynamics reverse. Instead of generating lift, the shape now encourages the disc to drop. Without that rim underneath channeling the air, the disc falls faster once the momentum dies.
This means upside down throws have a few distinctive characteristics that you need to understand and plan for.
They drop more quickly. Once the initial momentum fades, an upside down disc comes down fast. It does not hang and float like a backhand or flick. It arrives.
They make an S curve. The flight path of an upside down throw is much more dramatic than a backhand or flick curve. It sweeps one direction, then curves back the other way as it descends. Learning to predict and aim that S curve is the key to accuracy with these throws.
They are perfect for tight drops. Because they come down at steep angles, sometimes nearly perpendicular to the ground, upside down throws can land in windows that flat throws simply cannot reach. A flat flick has to travel horizontally to get somewhere. A hammer can arc over a wall of defenders and drop straight down into a pocket of space behind them.
They are less affected by certain winds. This might surprise you, but upside down discs are not manipulated as much by wind in some conditions. The inverted shape interacts with air currents differently, and in certain windy situations, a hammer will hold its line better than a flat throw.
Once you internalize these physics, the specialty throws stop feeling random and start feeling predictable. The S curve is not chaos. It is a pattern. And patterns can be learned.
THE HAMMER: The Zone Destroyer
Harper Garvey, handler for the New York Empire, told me something that stuck: "The hammer is pretty underutilized in frisbee. I think we'll continue to see more hammers."
I agree with Harper completely. The hammer might be the most powerful specialty throw in Ultimate, and most players do not use it nearly enough. Let me tell you why it is so deadly.
Imagine someone is on the right side of the field. A cutter breaks left, running to the far side where the open space is. Everyone else on the field is shifting right, expecting a flick. But you do not throw a flick. You launch a hammer that sails over everyone's heads, arcs across the sky, and fades perfectly into the back corner where your cutter is waiting. The defense never had a chance because they were defending a horizontal throw and you went vertical.
You simply cannot throw a flick over a defender and have it drop in behind them without the receiver running out of bounds. The geometry does not work. The flick travels in a flat plane. But the hammer? It goes up, over, and down. It drops into spaces that flat throws cannot reach. That is why it destroys zone defenses. The zone sets up a wall of players to block horizontal throws. The hammer sails right over the wall like it is not even there.
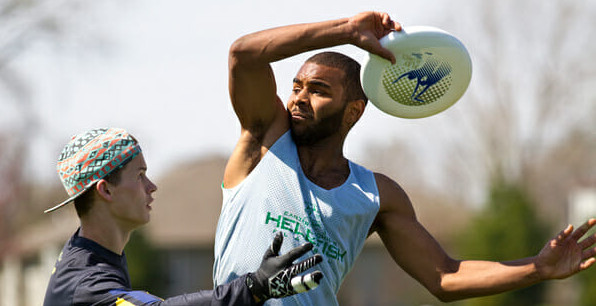
The Hammer Grip
Here is the best part: you already have the hammer grip. It is the exact same grip as your flick forehand. Index and middle finger on the rim, thumb on top. The only difference is that you turn the disc upside down. Now your thumb is on what used to be the bottom, and the rim faces up toward the sky.
If you have a solid flick grip, you have a solid hammer grip. You do not need to learn anything new with your fingers. You just need to learn to throw from a different angle.
Two Styles of Hammer
There are two main ways to throw a hammer, and understanding the difference will help you choose the right one for each situation.
The High Arc Hammer. You throw it really high up in the air. It arcs like a rainbow, peaks, and then drops straight down from the sky. It often comes in a bit wobbly, but it lands in very tight windows because it is falling nearly vertically. This is the more forgiving style and the one most players learn first. If you do not have great spin yet, the high arc gives the disc more time to sort itself out in the air.
The Horizontal Hammer. This one stays flatter throughout the flight. It requires a lot more spin to control, because without the high arc to slow things down, any wobble or tilt gets amplified. The flight path is more predictable and the disc arrives faster, but it demands better mechanics. This is the style you work toward once your spin is consistent.
Start with the high arc. Learn what the S curve looks like and how to aim it. Once you are landing hammers consistently, start bringing the arc down and throwing flatter. That progression will happen naturally as your spin improves.
The Hammer Motion
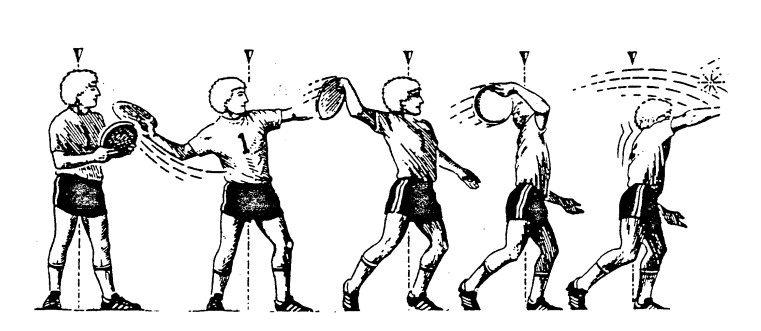
Where the disc starts: Beside your head, slightly behind, tilted back and ready to launch forward. Your wrist should be cocked back like you are about to throw an axe at a target. Which, in a way, you are.
The throw: Bring the disc forward over your head and release above and slightly in front of your face. Your wrist snaps through exactly like a flick. In fact, the wrist snap IS the flick snap. The same finger push, the same wrist acceleration, the same follow through. You are just doing it from above your head instead of from your hip.
The follow through: Let your hand continue toward your target after the release. The more snap you get, the more spin. And the more spin, the straighter and more predictable the flight. Without enough spin, the hammer wobbles and fades unpredictably, and you end up throwing a gift to the other team.
The Visualization That Changed Everything
David Raflo, USA Ultimate's Events Manager, shared a visualization with me that immediately improved my hammer accuracy. It is so simple and so powerful that I want you to read it twice.
"If you're throwing a hammer to somebody, you're throwing it over YOUR right shoulder. What you want to do is throw it over THEIR right shoulder."
Think about that. The hammer releases from your right side and curves left as it flies (for a right handed thrower). So you aim it as if it is going over the receiver's right shoulder. The S curve will carry it from your release point, over the defense, and down to your target. If the receiver is cutting away from you, aim for their left shoulder instead and let the curve bring it around.
David also gave me a target height: aim for chest level arrival. "The hammer by its nature is designed to be thrown up in the air. You don't want to wait and have it come down low." The hammer naturally drops, so throw it to arrive at the receiver's chest, not their feet. This gives them the best chance of catching it cleanly.
The Dodgebee Hammer
Here is something I discovered through playing dodgeball style games with Dodgebees: I almost always throw a hammer. And the reason might surprise you.
The hammer is actually a precision throw. The S curve, once you understand it, is predictable. You can pick up the disc rim up, launch it immediately, and hit a running target with accuracy that surprises even you. Compare that to the flick where you have to flip the disc over, cock your elbow back, load your wrist, and then throw. The hammer is faster off the hand when the disc is already rim up.
For solo practice, the Dodgebee is perfect for hammer training. It goes upside down easily because it is soft and flexible. It floats more than a standard disc, which gives you more time to read the flight path. And when you miss your catch (which you will), it does not hurt when it lands on your head.
THE SCOOBER: The Hammer's Quick Sibling
If the hammer is a home run swing, the scoober is a bunt. Same family. Same upside down flight. Completely different tempo.
The scoober uses the same grip as the hammer and flick. The disc is upside down with your thumb on what used to be the bottom. But instead of throwing from over your head with a big windup, you release from chest level with a quick scooping upward motion. The disc pops up in front of you, floats over whatever is in the way, and drops down softly on the other side.
The scoober gets off your hand much faster than the hammer. There is almost no windup. You just scoop and release. That speed is what makes it so effective as a surprise throw. By the time the defender recognizes what is happening, the disc is already floating over their head.
The Scoober Motion
Where the disc starts: In front of your chest. Arm bent, disc close to your body. Wrist cocked back.
The throw: Scoop the disc upward and outward, releasing it in front of you with a gentle push. The disc pops up, travels forward, and makes a softer, gentler version of the hammer's S curve. The wrist snap still matters, but the power level is much lower than the hammer. This is a touch throw, not a power throw.
The catch: The scoober hangs in the air. It floats. It drifts. It has a soft, almost lazy quality to its flight that is deceptive, because the receiver has to read that float and time their catch on a disc that is descending slowly and unpredictably. In windy conditions, the float makes the scoober harder to catch because the wind pushes it around while it is hanging up there.
When to Use the Scoober
The scoober shines in very specific situations, and knowing those situations is what turns a trick throw into a tactical weapon.
Short passes over the mark. When a defender is in your face and you need to get the disc past them quickly, the scoober pops up and over before they can react. It is faster to release than a hammer and requires less space to throw.
Breaking the mark with surprise. Most defenders are positioned to stop horizontal throws. They are not expecting something to pop up from chest level and float over their head. The scoober's release is so compact and unusual that it catches marks off guard consistently.
Tight endzone situations. When you are close to the endzone and need a soft throw that drops into a small window, the scoober's gentle float is perfect. It arrives slowly enough to be catchable and from an angle that defenders struggle to guard.
When the defender guards your flick low. If the mark is pressing down on your flick side, taking away the low release, the top is open. The scoober exploits that gap by going over instead of around.
The Faking Game
The scoober becomes even more powerful when combined with fakes. Here is a sequence that works beautifully against most marks.
Fake the hammer. Watch the defender look up. Now fake the scoober. Watch them freeze, unsure where the next throw is coming from. Try the backhand. See if the window opened while they were distracted. If not, fake again. Then throw whichever specialty throw has the best window.
The scoober fake is particularly effective because the motion is quick and compact. You can fake it multiple times without committing too much energy or losing your balance. Each fake pulls the defender slightly out of position. After two or three fakes, there is almost always a window somewhere.
Hammer vs. Scoober: How to Choose
When both throws are options, here is how to think about the decision.
Need to throw long distance over a zone? Hammer. The overhead motion gives you more power and the higher arc covers more ground.
Need a quick short pass over the mark? Scoober. Faster release, less windup, element of surprise.
Tight endzone pocket? Either one works. Both drop nicely into small windows.
Defender watching your hands closely? Scoober. The compact release is harder to read than the big hammer windup.
Need maximum hang time? Hammer. The higher arc keeps the disc in the air longer, giving your receiver more time to get underneath it.
Catching the disc and need to throw immediately? Scoober. Less windup means you can transition from catch to throw in almost no time.
THE THUMBER FAMILY: Four Exotic Variations
Now we get into the throws that make people stop mid sentence and say, "What was THAT?"
The thumber family includes four variations that all use your thumb as a key part of the grip and release. These are the exotic throws. The ones that most players have never seen, let alone attempted. Master even one of them and you have a tool that nobody on the field can predict or prepare for.
Remember: you trained your thumb extensively in Chapter 4 with the Hula Hoop Drill and in Chapter 5 with the lying on your back thumb throws. Those drills were not random. They were building the thumb strength and coordination that these throws require. The foundation is already there.
Thumber #1: The Traditional Thumber
The traditional thumber is like throwing a baseball over your shoulder. It is the sister throw to the hammer, hitting the OPPOSITE side of the field. Think about that for a moment. The hammer curves one direction. The traditional thumber curves the other way. Having both in your arsenal means you can attack either side with an upside down throw from overhead. The defense cannot cheat to one side.
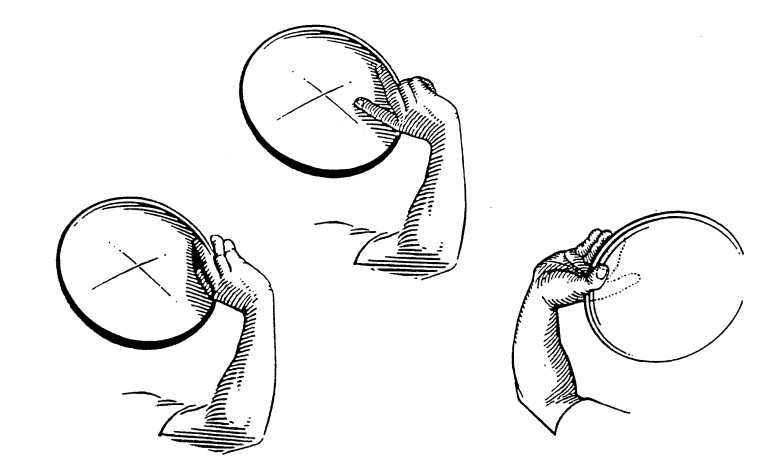
The grip: Thumb on the inside rim, underneath the disc when it is upside down. Fingers spread on top of the flight plate. Grip it like you are palming a small plate.
The motion: Extend your arm to your side, about arm's length from your body. Cock your wrist back like you are throwing a baseball. Swing your arm forward in a sidearm motion, and the disc rolls off your thumb as it releases. You can almost get a jump with it as you twist your body and let it go. Use that body rotation to generate power, just like a baseball pitcher uses hip rotation to drive the ball.
I was in a hat tournament once with a kid who was maybe 20 years old, and the thumber was his MAIN throw. He would throw it and it looked like it was coming from inside his elbow. Virtually unguardable. He got distance on it, spin on it, accuracy on it. That convinced me it is absolutely worth learning. If one person can make it their primary weapon, it has more potential than most players give it credit for.
Thumber #2: The Chicken Wing
The chicken wing is the most controversial throw in the thumber family. Some people love it. They use it as their main throw. They swear by it. Other people think it is pointless. They say, "Just throw a flick."
The truth? The chicken wing has real tactical advantages that make it irreplaceable in specific situations. And it has a history that goes all the way back to the founding of the sport.
The grip: Thumb on the inside rim, underneath. Fingers on top of the flight plate. This is the OPPOSITE of your flick and backhand grip. Everything is inverted.
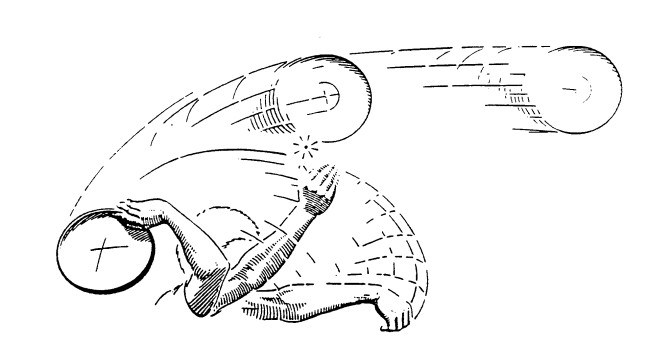
The motion: Bend at the wrist, elbow, and shoulder. Tuck the disc under your armpit. Step back on your opposite leg and twist your back for windup. Then unwind like a spring. The disc will seem to pull, almost rip, out of your hand. Release over your shoulder toward your target.
A warning for your first attempts: the disc releases much earlier than you expect. Much earlier. It takes many practice throws before you can predict where it will go. Do not get discouraged by wild throws in the beginning. That is normal.
Why the Chicken Wing Is Virtually Unguardable
The chicken wing has several properties that make it a nightmare for defenders.
The release point is above your shoulder. Defenders position their bodies and their hands to block throws coming from hip to chest height. The chicken wing comes from above that zone. By the time they lift their arms to block it, the disc is already gone.
The motion is very fast. From tuck to release, the chicken wing happens in a blink. There is no long windup for the defender to read. One moment the disc is tucked under your arm. The next moment it is flying over your shoulder.
The angle is completely unique. No other throw has the same release trajectory. Defenders who have trained their instincts against backhands, flicks, and hammers have no template for what a chicken wing looks like coming at them. It breaks their pattern recognition.
And some people can throw chicken wings 70 yards. Most players get 30 to 50 yards with it. That is legitimate distance from a throw that nobody sees coming.
The Greatest
Here is why the chicken wing REALLY matters, beyond all the tactical advantages.
The Greatest is one of the most spectacular plays in Ultimate. You are running full speed toward the sideline. The disc is sailing out of bounds. You jump, extend your body in the air, catch the disc at full stretch, and then, before your feet touch out of bounds, you throw it back into the field to a teammate. All of that happens in the air. In less than a second.
And the chicken wing is often the throw you use for The Greatest. Here is why: timing. When you catch the disc in the air with your thumb underneath and fingers on top, which is the natural catching position for a disc at full extension, you DO NOT have time to shift your grip for a flick or backhand. There are no milliseconds to spare. But you CAN immediately cock the disc back with your thumb underneath and launch it over your shoulder. Catch and release in one motion. The chicken wing saves the precious time that makes The Greatest possible.
Practice this: have someone throw a disc near a sideline. Catch it and immediately chicken wing it back before you land. Do not let the disc settle in your hand. The moment it touches your fingers, it should be on its way back out. That catch to release speed is the skill that makes The Greatest possible.
Jerry Mindes: 50 Years of Chicken Wing
Here is a story that might change how you think about "specialty" throws.
Jerry Mindes was one of the original players on the 1972 Columbia High School team. That is where Ultimate was invented. Jerry is one of the founders of our sport. He has been playing for over 50 years.
And Jerry never learned the flick.
Instead, he uses the chicken wing to open up his right side and the backhand for his left. For more than five decades, he has been playing competitive Ultimate with a throw that most people consider a novelty. A trick. A "specialty" throw that is not really a real throw.
One of the founders of our sport uses the chicken wing as his PRIMARY throw. Think about what that means. It means the chicken wing is not just a trick. It is a legitimate weapon. It is a real throw that can replace the flick entirely if you put in the work to master it. Jerry is living proof.
Thumber #3: The Seabiscuit (Backwing)
This is my personal favorite of the exotic throws, and I will tell you why: it is the throw that nobody has ever seen. I have played hundreds of pickup games. I have watched professional AUDL games from the sideline. I have talked to players with 50 years of experience. And I have never seen anyone use the Seabiscuit in a real game.
Which means it is the ultimate surprise.
The grip: Same thumb underneath grip as the chicken wing. Thumb on the inside rim, fingers on top.
The motion: Instead of throwing over your dominant shoulder (like the chicken wing), you throw to your non dominant side. Flick your thumb backwards toward your target. The disc spins off to the opposite side of where anyone expects it to go.
The release is quick and compact. You cannot get too much spin on it, and the distance is limited. But the surprise factor is off the charts.
Here is a trick play that I love: fake the chicken wing on your right side. The defender reacts, shifting their weight. Then snap left with the Seabiscuit. The disc goes to the completely opposite side from where the defender just committed. They have no idea what just happened.
Will you use this in a game? Maybe. Maybe not. But practicing it teaches your hands to release the disc from an angle they have never used before, and that kind of variety builds the overall adaptability that makes you harder to predict in everything you throw.
Thumber #4: The Shoulder Throw
This one is the hardest to describe in words. It really needs a video to click. But here is the concept.
The grip: Thumb underneath the disc in a unique hand position, slightly different from the other thumber variations. Fingers spread for stability.
The motion: The disc starts outside your shoulder, arm extended outward. You release by extending from your shoulder out, and the disc flies from a high release point on a trajectory that curves in a way nobody expects. It comes from an angle that does not exist in any other throw.
You can actually throw it pretty far this way. It looks strange. It sounds strange when you describe it. But when you see it in person, it makes sense. And like all the specialty throws, it is virtually unguardable when done right, because the defender has no frame of reference for what is happening.
I will put a video demonstration up for this throw because the text alone cannot do it justice. Check the video link for this chapter when it is available.
The Full Arsenal: Every Throw in Ultimate
Let me step back for a moment and show you what you have built over the last two chapters.
The main throws in Ultimate Frisbee are: the backhand, the flick forehand, the push pass, the hammer, the scoober, the thumber, the chicken wing, and the blade (a sharp outside in throw at steep angles). Some people count the lefty versions as separate throws, which they basically are since they use different muscles and different coordination.
If you have been following along and practicing, you now have exposure to every single one of those throws. Some are further along than others. Your backhand is probably the most developed. Your chicken wing might still be completely wild. That is fine. The point is that you know they exist, you understand the mechanics, and you have a starting point for each one.
No single player uses all of these throws in every game. Khalif uses three. Some players use five. A few rare players use seven or eight. But the more tools in your bag, the more situations you can handle. And the more situations you can handle, the more valuable you are to your team.
Think about it this way: people love the Harlem Globetrotters because it is fun to watch them do creative things with a basketball. If there were more Ultimate players doing creative things with the disc, throwing chicken wings and Seabiscuits and shoulder throws in competitive situations, it would attract more people to watch the sport. Most players do not experiment because they want to be safe. They want to score points.
My philosophy is different. Learn as many throws as you can. Then teach others how to do them too. It is a fun conversation starter. It builds community. And when you need one of these throws in a game, you will have it.
Solo Practice for Specialty Throws
All of these throws can be practiced alone. Here is how.
The vertical throw and catch. Go to an open field. Throw each specialty throw straight up or at a forward angle. Watch the flight path. See the S curve, the float, the drop. Then get under it and catch it. This works for hammers, scoobers, and thumbers. The vertical flight shows you things about the disc's behavior that a horizontal throw to a target cannot.
The Dodgebee advantage. The Dodgebee is perfect for hammer and scoober practice. It goes upside down easily because it is soft and flexible. It floats more, giving you more time to read the flight. And when it hits you in the face (it will), it does not hurt.
Target practice. Can you hit a trash can with a hammer from 20 feet? From 30? Remember, you have to aim to one side and let the S curve bring it in. That is a different aiming skill than backhands and flicks. Give it time. The curve becomes predictable.
The full throw rotation. This is one of my favorite solo sessions. 10 backhands at a target. Then 10 flicks. Then 10 hammers. Then 10 scoobers. Then 10 thumbers. Then 10 chicken wings if you are feeling brave. Rotate through every throw you know. This builds versatility and prevents you from falling into the trap of only practicing your best throw.
The Greatest drill. You need a partner for the full version, but you can practice the catch to chicken wing transition solo. Throw a disc up in the air near an imaginary sideline. Catch it at full extension and immediately chicken wing it forward before your feet touch. Practice the speed of the transition. Catch and release. One motion.
The Ambidextrous Challenge
Here is your next level goal, and I know it sounds crazy: try all of these throws with your non dominant hand.
A lefty hammer. A lefty scoober. A lefty chicken wing.
When you can threaten specialty throws from BOTH sides, the defense has nowhere to hide. They cannot overplay one direction. They cannot cheat to one side. You become genuinely, completely unpredictable. Every throw from every angle from either hand.
Start with short throws. Do not worry about distance. Just get the motion down, feel the release, understand how the disc flies from your off hand. Every rep builds muscle memory. And one day, months from now, you will pull out a lefty scoober in a pickup game and the look on everyone's face will be worth every awkward practice throw that came before it.
Keep It Fun
Here is the thing about specialty throws that I want you to remember above everything else in this chapter: they keep the game fresh.
One possession you throw a hammer that drops into a tight window. The next you fake the scoober and go backhand. The next you pull out a chicken wing that nobody saw coming. Every time you use a different throw, the defense has to recalculate. They have to adjust their positioning. They have to think. And a thinking defender is a slow defender.
Even if you mess up, and you will mess up, usually people laugh and have a good time with it. Unless it is a big important game and you have a much more secure throw available, these throws are designed to be fun AND useful depending on whatever situation you find yourself in.
The sport of Ultimate is growing and always evolving. If you can be good at a variety of throws, maybe you will find new ways to open up the game that nobody has thought of yet. Maybe you will inspire other people to try something different than the traditional backhand or flick. Maybe you will be the player at pickup who throws a Seabiscuit and suddenly five other people want to learn it.
Learn as many throws as you can. Then teach them to someone else. That is how the sport grows. That is how the community gets stronger. And that is how you become the kind of player that people remember.
Wrap Up
◆ Specialty throws go over the defense when horizontal throws are blocked. They are your bishops on the chess board.
◆ Master your backhand and flick FIRST. Specialty throws are privileges earned through proven fundamentals.
◆ Upside down discs drop faster, make S curves, and land at steep angles. Understanding the physics makes the throws predictable.
◆ The hammer is the most powerful specialty throw. Same grip as the flick, thrown from over your head. Aim over the receiver's right shoulder.
◆ The scoober is the hammer's quick sibling. Same grip, released from chest level, faster off the hand, softer float.
◆ The thumber family (traditional, chicken wing, Seabiscuit, shoulder throw) gives you exotic angles that nobody expects. The chicken wing is essential for The Greatest.
◆ Jerry Mindes, one of the founders of Ultimate, has used the chicken wing as his primary throw for 50+ years. It is not just a trick. It is a legitimate weapon.
◆ Practice all specialty throws solo by throwing them straight up and catching. Use Dodgebees for safer, floatier practice.
◆ Try everything with your non dominant hand. A lefty hammer from a player who has never shown one before is the ultimate surprise.
Action Steps
→ This week: throw 20 hammers at an open field. Focus on spin. Try both the high arc and horizontal styles. Watch the S curve develop.
→ Try 10 scoobers from chest level. Aim for a soft, floating release. Feel how different the tempo is from the hammer.
→ Pick one thumber variation that appeals to you. Throw it 30 times. Get comfortable with where your fingers go and how the disc leaves your hand.
→ Practice the faking sequence: fake hammer, fake scoober, throw backhand. Do this 10 times against an imaginary mark. Feel the rhythm.
→ Do the full throw rotation: 10 backhands, 10 flicks, 10 hammers, 10 scoobers, 10 of your chosen thumber. Rotate through your entire arsenal.
→ Throw 10 left handed hammers. They will be terrible. That is fine. Start building that muscle memory one throw at a time.
→ If you have a partner, practice The Greatest drill: catch a disc near the sideline and immediately chicken wing it back. Time the catch to release speed. Get it under one second.
Mentor's Closing
When I started playing Ultimate, I knew one throw. The backhand. That was my entire vocabulary. One word. And I could only say it one way.
Over the years, throw by throw, drill by drill, I have built an arsenal that includes every throw in this chapter. Some of them I am great at. Some of them I am still learning. The lefty chicken wing is a work in progress. The Seabiscuit still surprises me when it actually goes where I aimed it. And the shoulder throw? I am still figuring that one out.
But here is what I know for certain: every throw I have learned has made me a more complete player. Not just because I can use it in a game, but because learning it taught me something new about how the disc flies. Every grip, every release angle, every S curve, every wobble and every perfect spiral has added a layer to my understanding of this spinning piece of plastic that we all love so much.
You do not need to master every throw in this chapter by next week. Or next month. Or even next year. But start trying them. Start experimenting. Throw a hammer at the sky and watch where it goes. Tuck a disc under your armpit and see if you can chicken wing it over a fence. Launch a thumber and laugh when it sails in a direction you did not expect.
The more throws you try, the more throws you have. And the more throws you have, the more situations you are ready for. On the field and off.
Your arsenal is growing. :)